

In this new series, I am going to be exploring the Copilot Agent Toolkit, going deep into all of its features, exploring what to use when and how to get the most out of this completely free tool provided by the Microsoft CAT team.
But first, what is the toolkit? Well, those of you who have been around the block for a bit may remember the Center of Excellence (CoE) toolkit for the Power Platform before everything eventually got moved to the Power Platform Admin Center (PPAC)? This toolkit comes from that same team that built and addresses similar requirements other developers had when building on the Power Platform, except now this kit is exclusively for Copilot Studio.
The Copilot Agent Toolkit is a suite of free tools that allow you to go even further when developing agents on the Copilot Platform with features like:
- 📋 Agent Inventory – Tenant-wide inventory of agents, configurations, and metadata.
- ✅ Automated Testing & Rubrics: Batch test agents at scale, measure response quality, and validate generative AI outputs using custom evaluation criteria. This helps ensure agents are reliable before deployment.
- 🛡️ Compliance Hub: Define and enforce governance policies, detect risks, manage violations, and drive remediation workflows across all agents in the organization.
- 🔍 Agent Debugger – Step-by-step troubleshooting to understand how an agent generated a response
- 🃏 Adaptive Cards Gallery – Reusable Adaptive Card templates and examples.
- 📊 Agent Insights Hub – Centralized analytics and monitoring using telemetry and conversation data.
- 🩺 Agent Review Tool – Detect anti-patterns, security concerns, and performance issues.
- 📚 Agent Library – Catalog of reusable agent templates and components to accelerate development.
And so many more, each of which we are going to be getting into in great detail throughout this series!
⚙️ Installing the Copilot Agent Toolkit
But first, we need to actually install the kit before we start exploring and there are a few pre-requisites before we can dive right in:
- A Power Platform environment with Dataverse enabled
- Your install user must be a System Administrator in that Environment
- Power Apps Code Component Framework for Canvas Apps and Power Apps Code Apps must be enabled in the Environment
- Licencing for Power apps and Power Automate for premium connectors.
- Installing the Creator Kit
I have installed this in a completely fresh tenant, so let’s walk through this, step by step.
🌎 Step 1 – Setting Up Your Environment:
You may need a Power Platform Admin to help you with this if you do not have permissions.
First, we need to create the environment and ensure Dataverse is enabled. If you have an environment already good to go with a Dataverse store enabled, you can skip this step. Navigate to PPAC and click on Manage on the right hand side. Then click Enviornments and then the +New button up top:
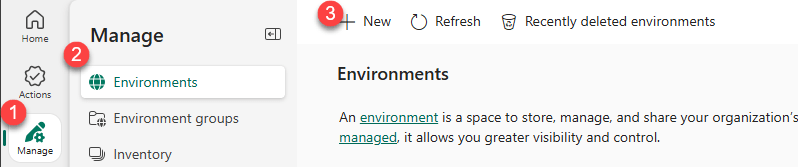
This will pop open a new pane where we will provide details for our new environment.
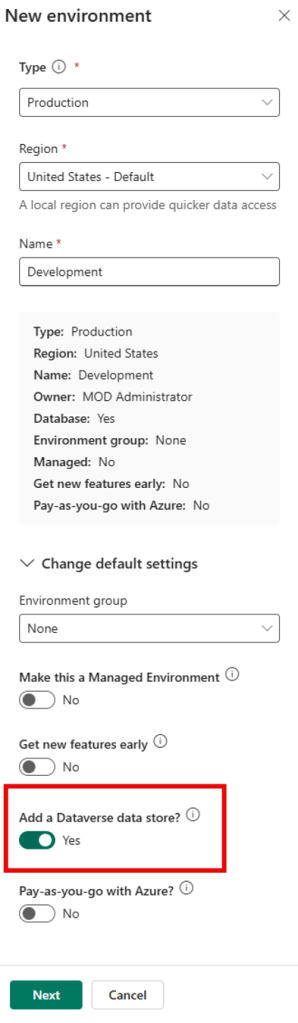
The most important detail here is that you add a Dataverse store, otherwise we will not be able to properly install the toolkit. Once this is done, click Next and Save and wait for the environment to provision. Once provisioned, we will need to enable some features. If you are already using an existing environment, make sure you have these features enabled before installing the kit.
Next open the Settings pane of the newly created environment and go to Product > Features. In here, we are looking for these two settings: Power Apps Code Component Framework for Canvas Apps and Power Apps Code Apps. Make sure both are enabled like the screenshot below and click Save.

Great – now your environment is set up! We’re going to ensure your user has the correct permissions to perform the install.
🔒 Step 2 – Checking your User Access
Going back to PPAC, you will want to check that your user has System Admin access within the environment you intend to install the kit in. Navigate to PPAC, go to Manage and select the environment you are going to use or the environment you just created. Click on Users and locate your user. Ensure you see System Administrator listed under Direct Assigned Roles
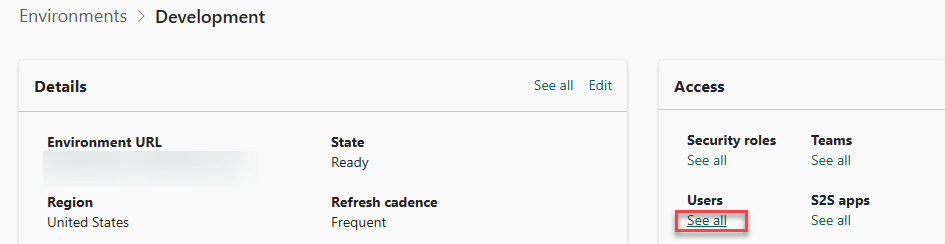

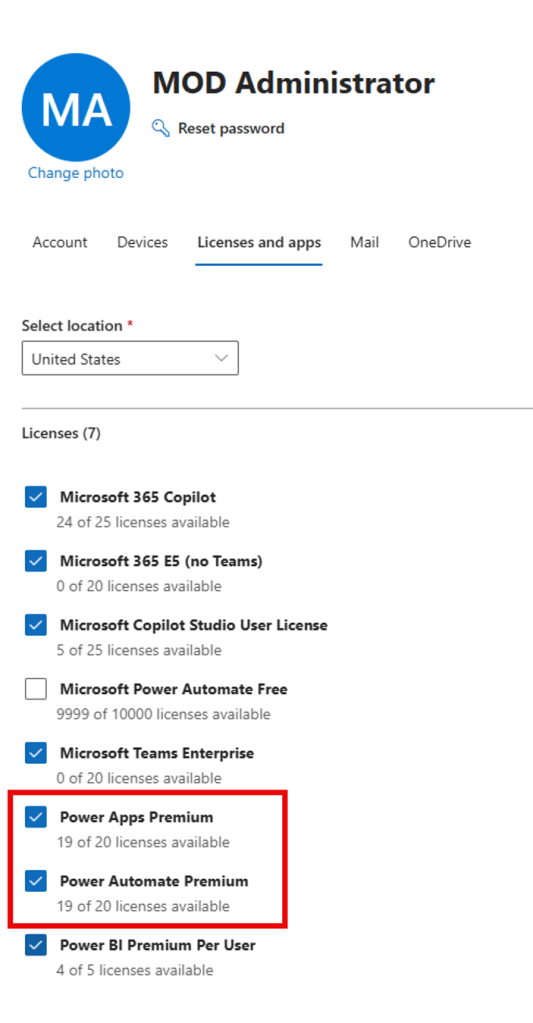
This looks good so far! Now, let’s ensure this user (me!) is licenced correctly. To do this, we’ll need to navigate to the M365 Admin Center. Again, you may need someone else to check this for you.
Once in, you’ll navigate to Users from the left pane, Active Users and locate the user you’re installing the kit with. Then look at the Licences and Apps tab. We’re looking to ensure the user has access to run a power apps and power automate flows, both with premium capabilities. In my example below, we can see that my user has licences that will allow for this. More information about licensing capabilities can be found in the latest edition of the Power Platform Licencing Guide.
🎨 Step 3 – Installing the Creator Kit
The final step is to ensure we have the Creator Kit installed in the environment as many components of the Copilot Agent Toolkit has dependencies on this. Information about installing the kit can be found here. We’re simply going to download the solution by clicking here and importing it into the same environment you intend on installing the Copilot Agent Toolkit into.
If you’re not familiar with importing solutions, it is important to understand the process before you begin. You can start learning more here.
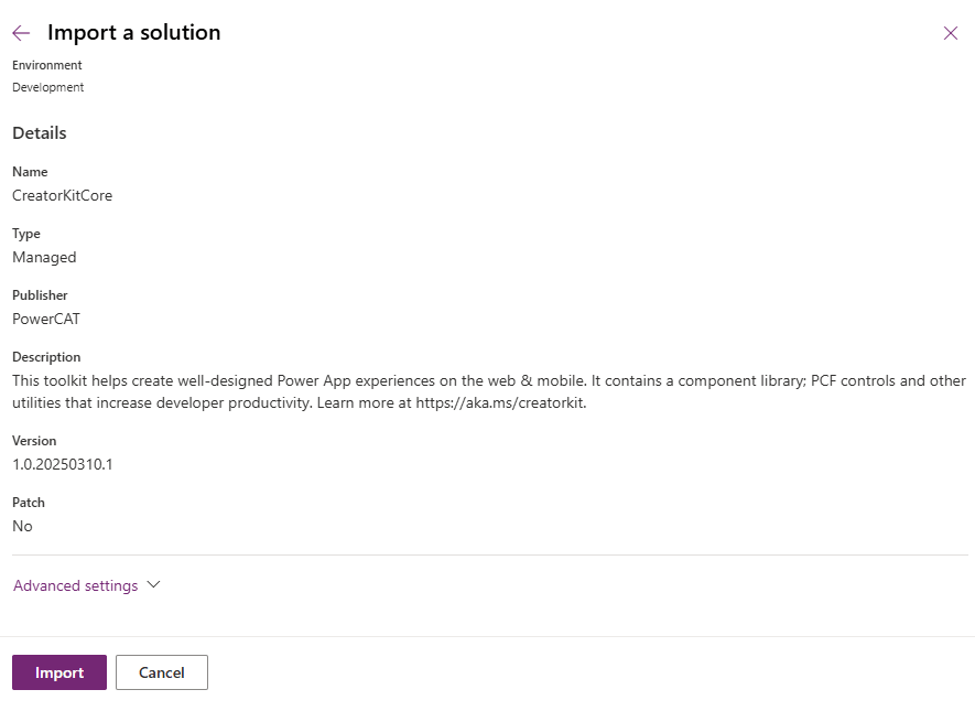
Once the Creator Kit has installed, we’re ready to go!
🧰 Step 4 – Installing the Copilot Agent Toolkit!
You’ve made it this far, now we’re ready for the grand finale! There are a few ways we can install the toolkit, all of which have been outlined in the documentation here. In this post, I have decided to install via the Marketplace. Guidelines to install via solution from GitHub have been provided in the documentation.
First, we need to access the Marketplace. Important Note – you will need to be logged in as the user you intend to install the kit as!

Once you click the Get it now button, you will be automatically navigated to your Power Platform Admin Center (This is why it is important to be logged in as the user you are installing the kit as) and you will be asked to select the environment to install into:
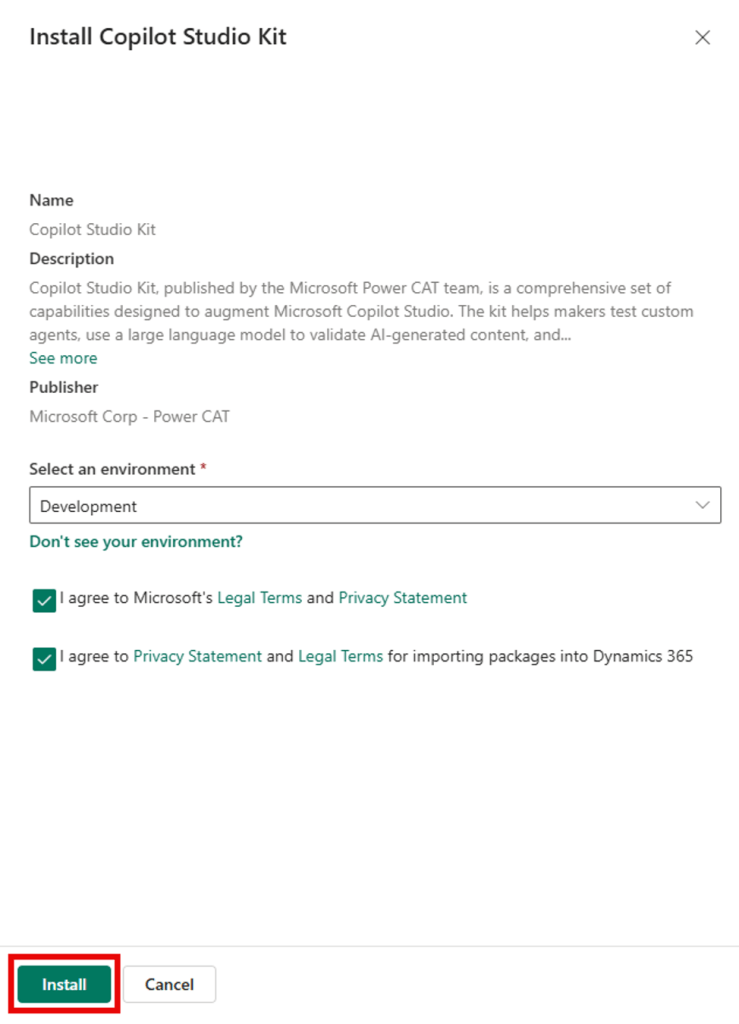
Select the environment you created or the one you wish to use and then select Install. Now, it will look like nothing happened or is happening. I had to double check an install was happening. Walk away and get a snack – give it a solid 15 – 20 minutes. Maybe even 30 minutes if you’re installing at a peak usage time. If you want to check if something is happening, Look at the history section of your solutions.
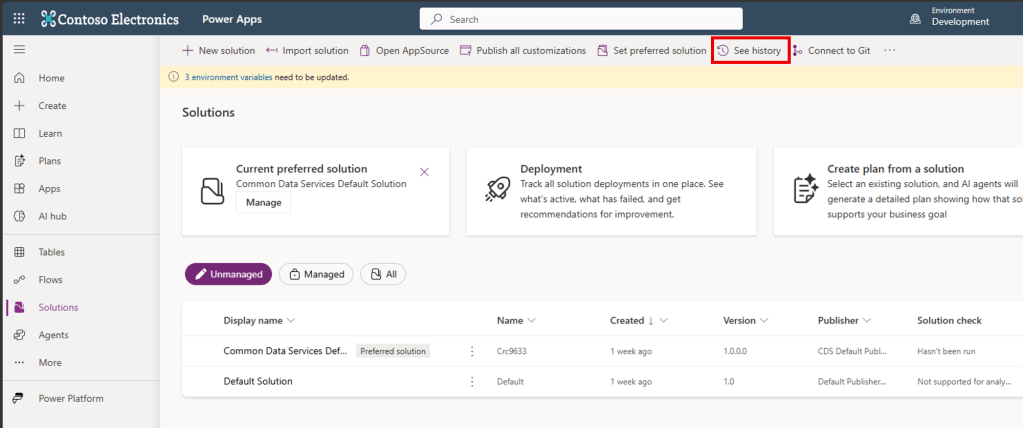
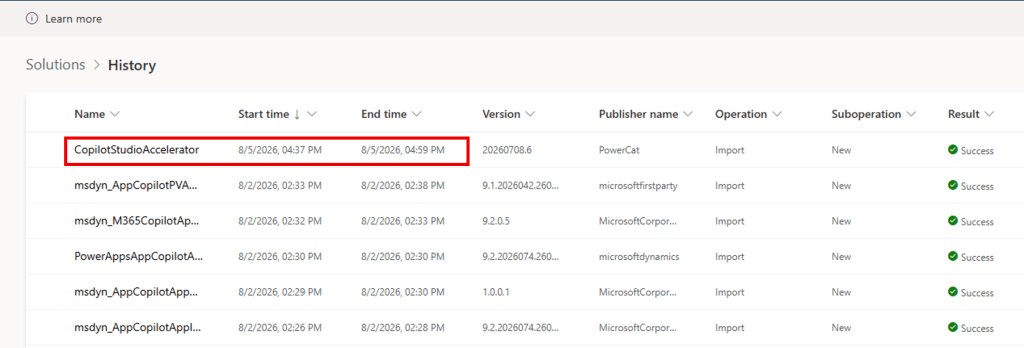
In my case, you can see the install took closer to about 20 minutes total.
Once the solution is installed, it will look like this:
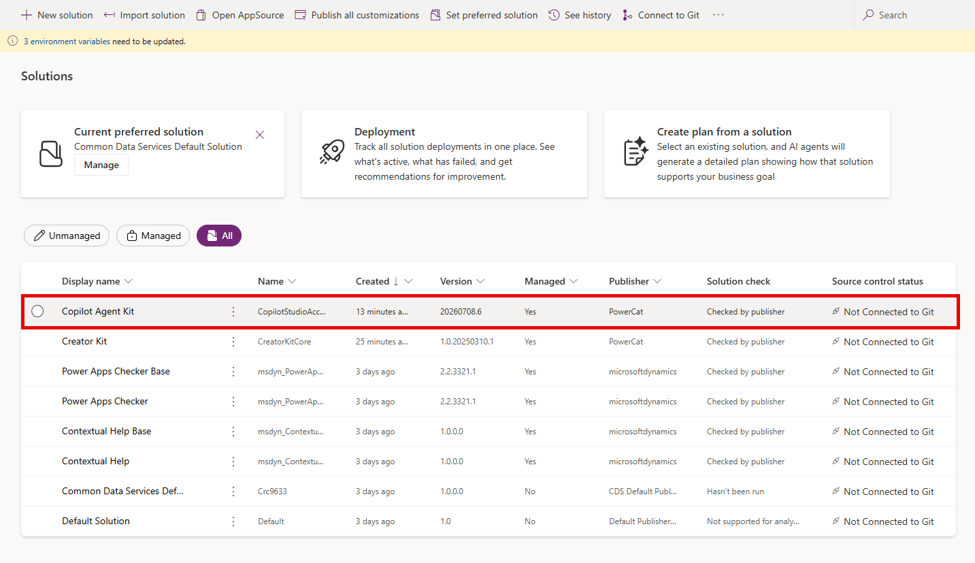
Our final step will be to update some connection references. Open up your solution and navigate to the Dataverse connection reference:
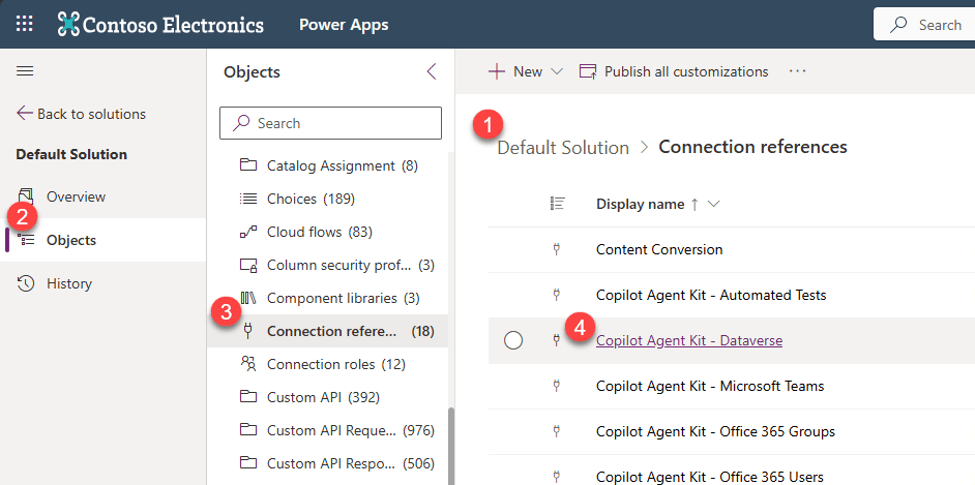
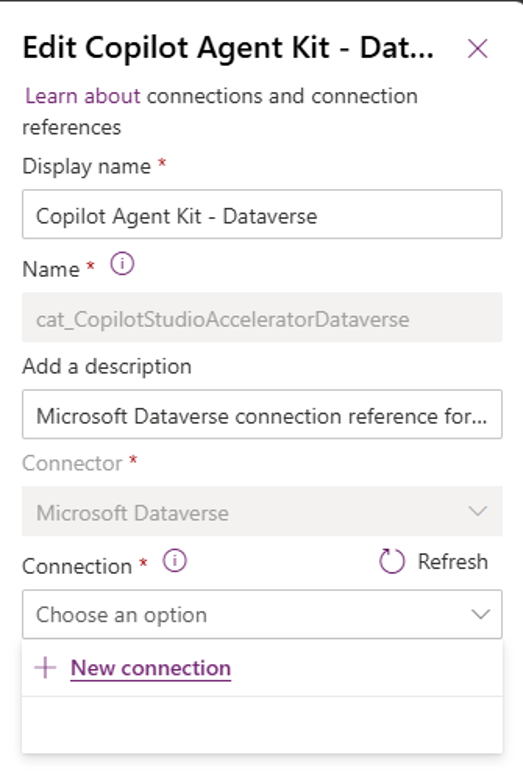
This is why, in the very beginning, we had to ensure we installed in an environment that had a Dataverse store. We are going to name the connector so we can recognise it first, then select New Connection.
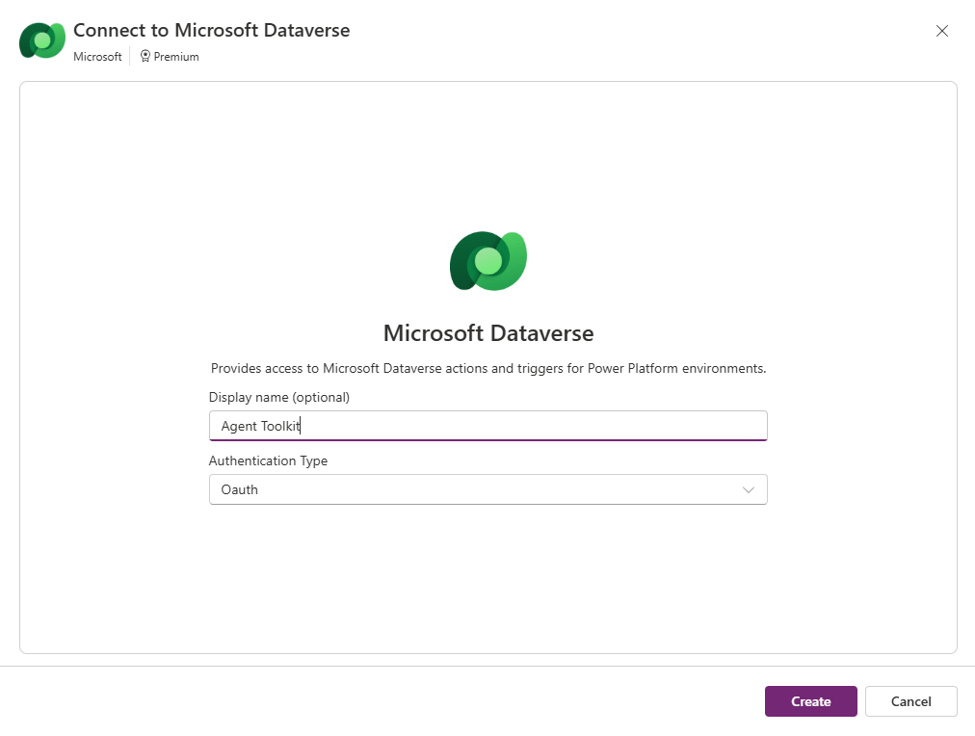
When you click New Connection, you will be shown a screen like the one below and asked to authenticate. Again, use the credentials you have installed the kit with, or with a service user. Whichever user you wish to run the connection as. This connector will be used to store all the data and info about agents that the kit collects.
And there you have it! The install of the kit is now done! Our next step will be configuration and a deep dive of all the amazing features the kit includes. Clap yourself on the back, you’ve just made one huge step towards more efficient, effective and better governed agents for you and your enterprise!


4 thoughts on “Let’s Get Started with the Copilot Agent Toolkit”